August 29, 2014

You Inspire Me, Free pattern and Guest tutorial

Hello all, I have a wonderful free embroidery pattern and guest tutorial to share with you today! Ortal wrote to us and asked if we'd like to share her work, and we were delighted to, it is just gorgeous!


I have made this embroidery as a gift to a close friend, Esti.
Esti, truly a positive thinker, is quite the opposite of me :). The sentence in the embroidery came to me after a meeting with her, expressing what she makes me feel.

I'm attaching the free pattern for personal use.
Find those who inspire you...

I have also prepared a tutorial for transferring patterns to fabric using a Laser printer and freezer paper below.

How to transfer the pattern to your fabric:

1.

2.

3.

4.

5.

6.


Feel free to contact me with questions:
beautifulground1 AT gmail DOT com

***

Thank you so much, Ortal, for sharing your wonderful pattern and tutorial with our readers!

Hi, I'm floresita, editor of Feeling Stitchy. I'm an avid stitcher, knitter, and crafter. You can see more of my stitching on Instagram and my blog. My vintage transfer collection is on Vintage Transfer Finds.

Feel free to email me with any ideas for the blog!

August 26, 2014

Tutorial Tuesday

Happy Tuesday, Everyone!

I recently purchased a new pair of embroidery scissors that came with a not-so-cute case from the manufacturer. Because these scissors are a bright red, I felt that they deserved a bright and colorful case or sheath to protect them from getting scratched or damaged when not in use. There are some really amazing embroidery scissor cases available out in the world, but I decided to make my own out of felt, and I am sharing the tutorial with you here.


To make your own embroidered scissor case/sheath you will need:

- felt in assorted colors
- embroidery supplies (floss, scissors, needles)
- pinking shears or decorative scissors

Felt is a fabric that holds its shape very well, so a hoop is not necessary.


Step One: Pick a felt color for the body of the sheath or case. I decided on a grey wool felt so that the colors would show up and really pop. 


Step Two: Use your scissors as a guide and cut an oval or egg shape around the scissors out of two pieces of felt. I trimmed the felt at 0.5 inches away around the handles and 1 inch away from the blades. From top to bottom the felt is 5.5 inches, at the widest mark it is 3.5 inches and it tapers down to about 1.5 inches at the bottom point or edge. Your scissors might be smaller or larger than the ones shown here, follow their length and width as a guide when cutting your felt. 


Step Three: Once the felt is cut, trim around the edges of both felt pieces using pinking shears or scissors with decorative blades. I have scalloped pinking shears, which I used here. 


Step Four: Take one of the felt pieces and fold the top edge over 1.5 inches. 


Use a running stitch to tack it down. 


Step Five: Cut 5 tear drop shapes out of felt pieces in the colors of your choice, plus two more in green. I cut out a few pieces before deciding on a color I would want as a flower. 


Step Six: Once you have decided on a flower petal color, thread your needle with a contrasting color, and use a running stitch to attach the petals just below the folded top.


Step Seven: Add french knots or a small felt circle for the center of the flower. Use a backstitch to attach the green leaves to the felt, just off center of the flower. (Please see photo in next step for the green leaves with a backstitch). 


Step Eight:  Place this folded and stitched piece of felt on top of the blank piece of felt. Thread a needle with a different contrasting floss color. Pull the needle and floss in between the two pieces of felt to hide the knot in between them. Use a running stitch to attach both pieces of felt together. Work your way around the whole case or sheath and hide the knotted end in between the front and back pieces of felt, as you did in the beginning. 


Step Nine: Place the scissors in their new sheath/case, and they are ready for stitching, or will at least look cute when not in use!


Hope you enjoy and have a great Tuesday!

Hi, I'm Kristen! I am a lover of all things stitchy and crafty. I have been sewing for as long as I can remember. My grandmother taught me how to sew Barbie clothes when I was young and I have been sewing ever since.

You can find me at Bobbypin Bandit, on Instagram, and my Etsy shop.

Winner of the Sew Cute To Cuddle giveaway!


Just a quick note to announce our random winner in the Sew Cute To Cuddle giveaway!

Congratulations, Machelle!

machellesews  
Oh my gosh! that hippo screams with cuteness! It is darling. What a great book! This Hippo tops my list as the project I would like to make 1st...LOL! Then I thing I would have to make the owl for my adult daughter. these look like they would ALL be fun to make. Yep, definitely hippo would be the one I would start with....

Thank you to the publisher for sending us a review book, including us in the Sew Cute To Cuddle blog hop and making this wonderful giveaway possible!

Hi, I'm floresita, editor of Feeling Stitchy. I'm an avid stitcher, knitter, and crafter. You can see more of my stitching on Instagram and my blog. My vintage transfer collection is on Vintage Transfer Finds.

Feel free to email me with any ideas for the blog!

August 23, 2014

Sew Cute To Cuddle Giveaway!


Hello ladies and gentlemen - if you are here for the Sew Cute To Cuddle blog hop, welcome! Today I'll be reviewing Sew Cute To Cuddle by Mariska Vos-Bolman, and it is a pleasure to do so! The nice people at Stitch Craft Create sent us a PDF copy of the book to review and they will also be sending 1 copy of this book to one lucky Feeling Stitchy reader!

Let's be clear that I am crafty but not of the sewing variety, so what I am offering is my inexperienced-at-sewing perspective. :) Well, if you can follow directions, you'll do just fine with this book. There are nice, clear diagrams and marks on the patterns that make it all very easy to follow along.

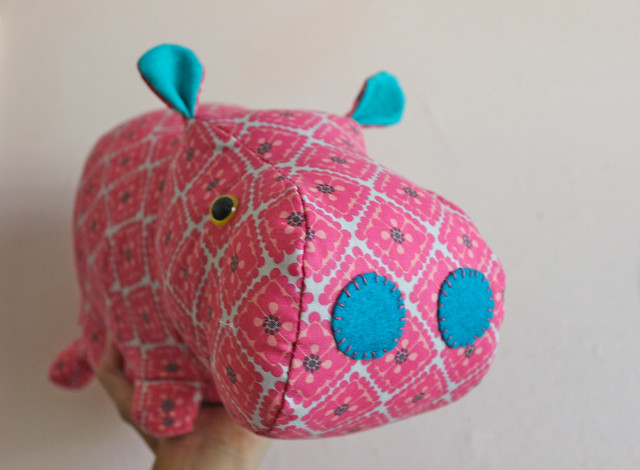
As proof, here is my finished hippo, freshly stuffed this morning:

IMG_8648

The book is well-laid out and inspiring, and I love the way the author mixes and matches her fabrics in such a creative way. It definitely inspires me to pair things in ways I wouldn't ordinarily have done. The patterns are friendly to hand-sewing, so if you're afraid of a sewing machine (like yours truly), you can still sew your way through all of them. My hippo occupied about 2 full nights of sewing. Also, be sure to buy LOTS of stuffing - this little hippo ate up a 12 oz bag and a half of another, so about 18 oz, total!

This little owl was crafted by our patterns blogger, Jo:

Here's what Jo, a more experienced seamstress, had to say about the book:

I've had so much fun sewing from Sew Cute to Cuddle. It looks a lovely book and I will definitely be sewing from it again, I think the tiger will be up next, in time for my daughter's birthday (or maybe Christmas) as she loves tigers. I have just one criticism of the book though - no seam allowance, although it was fantastic that you don't have to enlarge the patterns. I did change the pattern slightly by hand embroidering on the appliquĂ© pieces instead of machine sewing them on.

Be sure to stop by Emma Lamb's very thorough review, which includes wonderful details about the book and author, and which I will not try to reproduce here. Instead, I am keeping it brief with my final take on this book which is - totally worth it! If you like to sew stuffed creatures, or you are a relative sewing newbie, like myself, you will find the book a delightful addition to your craft library!

Here's a quick peek at all 12 toy patterns included in the book:


To enter our book giveaway, answer the following question: Which of these patterns would you make, or which is your favorite? I will close the comments on Sunday, Aug. 24 at 9 PM US CST, and we'll announce one random winner of the book soon after that.

Hi, I'm floresita, editor of Feeling Stitchy. I'm an avid stitcher, knitter, and crafter. You can see more of my stitching on Instagram and my blog. My vintage transfer collection is on Vintage Transfer Finds.

Feel free to email me with any ideas for the blog!

August 22, 2014

Colour Complements Giveaway Winner!


We have our random winner in the Colour Complements Giveaway!

Perle cotton 21, I think. They are all being to be used, especially for hardanger. 21 looks like storm clouds to me though. Hmm.

Congratulations, Whitney! I agree, 21 looks beautiful:


Thank you again to Lorraine from Colour Complements! If you're looking for some lovely hand-dyed threads be sure to visit Colour Complements on Etsy.

Hi, I'm floresita, editor of Feeling Stitchy. I'm an avid stitcher, knitter, and crafter. You can see more of my stitching on Instagram and my blog. My vintage transfer collection is on Vintage Transfer Finds.

Feel free to email me with any ideas for the blog!

August 20, 2014

Embroidered Shrine

If you have not been on Craftster lately then you are missing out on one of the most talented embroiderers out there today. Ludi's work is so haunting. She is able to create small works of art with a needle and thread. The above piece is a shrine that she made for a swap. Below is a side view so you can see all the tiny stitches. 
She has an etsy shop, The Imagination's Heart, in which you can purchase your very own small piece of art.

August 15, 2014

Giveaway - Hand-Dyed Threads from Colour Complements!


Earlier this week, Lorraine from Colour Complements wrote to ask if we'd be interested in doing a giveaway of her lovely hand-dyed threads - well yes, absolutely!


Aren't they amazing? Part of me would like to snap them up just to stare at them, and not do any stitching with them at all!


I mean really, how gorgeous are they?


Lorraine hand-dyes DMC perle cotton in sizes #5, #8, #12, and her Etsy shop also features fibers like silks, rayon, and other deliciously sparkly stuff.

I think you'll agree her shop is like a candy store for thread-lovers!


One lucky Feeling Stitchy reader will receive the 5 threads of your choice! Just leave a comment on this post by Friday, August 22, when I will choose one random winner. This giveaway is open to all of our readers!

In your comment, please tell us which of her threads is your favorite, and what you think you'd stitch with it!

Hi, I'm floresita, editor of Feeling Stitchy. I'm an avid stitcher, knitter, and crafter. You can see more of my stitching on Instagram and my blog. My vintage transfer collection is on Vintage Transfer Finds.

Feel free to email me with any ideas for the blog!

August 13, 2014

Watch Out! It's CATZILLA!


I'm pretty sure this is why we can't have nice things...Catzilla always playing around, wrecking a city or two. Melani stitch up Catzilla for her two year anniversary. Although it is an inside joke between her and her "better half," I'm sure we all can appreciate the cuteness of Thurston aka Catzilla. He is just too cute and fluffy to be mad at, I mean, we can rebuild, right?

August 12, 2014

Tutorial Tuesday

Hello and Happy Tuesday, everyone!

It's back-to-school time for many of us and today's tutorial is a fun way to add some stitchery to the school supplies either you or the kiddos might have to tote around. This pencil roll came together in one afternoon, it fits 10 pens or pencils, and is a fun way to keep all your writing instruments in one place.


To make your own pen/pencil roll, you'll need the following supplies:

- Two pieces of fabric for the exterior and interior measuring 12 inches wide by 7 inches tall
- Two pieces of fabric for the interior pocket measuring 12 inches wide by 4.5 inches tall
- 30 inches of Ric Rac or ribbon  
- Embroidery hoop, floss, needle, and scissors
- Iron and ironing board
- Sewing machine with necessary supplies
- Scissors

I used the "Make Something" pattern available from Urban Threads, and only transferred the pencil, marker, and felt tip pen. The pattern was only $1 and is available as an instant download. 

Step One: Print out your pattern, make sure to select that it is at 100% scale and not scaled to fit the page. Transfer the pattern to one exterior piece of fabric, keeping it one inch or more away from the edge of the fabric. I used osnaburg for the exterior because I like the natural look of the fabric and it's great for embroidery. 


Step Two: Embroider your pattern. I had to use a smaller hoop and embroider the pattern in two sections since it was on the edge of the fabric here. I used a back stitch for the whole pattern with 6-strand floss in 3-ply.


Step Three: For the pen/pencil pocket, take the two 12 by 4.5 inch pieces of fabric, place them right sides together, and stitch along the top long edge with a 1/4 inch seam allowance. 


Press this seam open.


Fold the fabric in half with the wrong sides together and press. 


Top stitch the folded seamed edge. 


Step Four: Place this pocket piece on top of the interior piece of fabric. Using a ruler, mark one inch lines along the pocket to create spaces for the pens and pencils. I used a pencil to mark the lines so they would show up in the photos, but I recommend using a water soluble pen to mark these lines.


Step Five: Stitch the pocket lines. These will create pockets for each individual pen or pencil and firmly attach the pocket piece to the interior piece of fabric. 


Step Six: Fold the Ric Rac in half and place it at the center of the short edge near the embroidery. With right sides together, place the fabric with the pocket on top of this. Pin in place. 


Stitch around the exterior of the fabric, leaving a 2 inch opening for flipping. 


Step Seven: Clip the corners of the fabric and flip so the right sides are facing out. Use a blunt object to push the corners out. Press the corners and use a pressing cloth to lightly press the side with embroidery. 


Step Eight: Top stitch the exterior of fabric. This will finish of the exterior edge, close up the space used to flip the roll, and add a second secure stitch to the Ric Rac.  I switched my sewing machine thread out to white, so that the edge along the outside wouldn't be too noticeable. 


Step Nine: Add pens and pencils, roll it up, and you are ready to go!


Hope you give this tutorial a try and have a very happy Tuesday!

Hi, I'm Kristen! I am a lover of all things stitchy and crafty. I have been sewing for as long as I can remember. My grandmother taught me how to sew Barbie clothes when I was young and I have been sewing ever since.

You can find me at Bobbypin Bandit, on Instagram, and my Etsy shop.

SITE DESIGN BY RYLEE BLAKE DESIGNS