April 27, 2014
My Rag Doll winner!
Hi, I'm Jo - I feature new embroidery patterns Sundays on Feeling Stitchy. I also post on our Twitter and Pinterest.
Is there a new pattern you'd like us feature? Email me!
April 24, 2014
Between Portugal and Scotland on the tip of a needle
Since the beginning, we had in our mind that we should "impregnate" both panels with our Portuguese embroidery soul... And that was the reason why we decided to choose, as much as possible, the stitches that are the most traditional in our regional embroideries... And that ended to be a great decision...
All the great choices belonged to Méri Almeida and Sofia Amaral M who led this giant effort of many embroiderer volunteers.
At the center of both panels, to fill in the cask, the most popular stitch from Castelo Branco Embroidery was used: "frouxo" stitch (frouxo means "loose), Castelo Branco Stitch or Oriental stitch - different designations for the same stitch profusely used in this silk embroidery but that ended being perfect in wool embroidery. Agulhas da Meri suggests this link about this type of embroidery that can be called laid-work.
But there were many others... Like the Portuguese stem stitch decorating the end of the cask on the Lisbon's panel or the four corners using four different stitches from Castelo Branco's embroidery.
At some point the embroiderers from Lisbon noticed that the wool yarn would not be enough to finish the four corners as it was supposed to. There would be slight differences in the colors... What seemed to be a problem, ended in such a great opportunity to enrich the panel... And four different stitches ended up decorating each corner of the panel, illustrating the richness and beauty of our Castelo Branco embroidery. Beginning bottom right and going clockwise we have: rede torcida (twisted net); pé de galo (cocksfoot); velhinhas (old ladies); crivo fingido (pretended openwork) (note: the designations in English are literal translations and not the real name of the stitches).
It was a very simple pattern, but at the end we had a beautiful panel, so balanced with the stitches' choice for the center and the corners...
 |
| Lisbon's panel and its four Castelo Branco's corners |
And the same effort happened in Oporto. The bullion knot, (ponto canutilho) very popular in many Portuguese embroideries from the North of the country and the "soul" of Guimarães Embroidery, beautifully filled in the white wig and one of the Castelo Branco's Stitches brought color and texture to the vine leaf. The choice for the bushy mustache was brilliant: the velvet stitch, from Guimarães Embroidery, was everything George Sandeman needed... And the Grilhão Stitch (Palestrina Stitch), very present in Caldas da Rainha Embroidery (and in so many others...), was perfect to fasten the mast of the Rabelo's boat.
 |
| Portuguese embroidery on a Scottish design, two countries on a panel. |
We ended this journey between Portugal and Scotland on the tip of a needle celebrating with Porto Wine... and we are already feeling saudade, such a Portuguese "mood"...
 |
| Wine Port, Portugal and Scotland, a journey on the tip of a needle... |
Don't forget to check the Scottish Diaspora Tapestry, once each day new panels are arriving from all around the world with incredible examples of beautiful wool embroidery...
April 22, 2014
Tutorial Tuesday
It appears that Spring has reached many of us, and I don't know about you, but the Spring cleaning bug definitely bit me! In organizing all my sewing and embroidery supplies, I quickly realized that I needed some labels. I am happy to share this tutorial with you for jar labels that can perk up your supply containers and help keep everything organized.
- felt in 9x12-inch sheet
- embroidery floss, hoop, and needle
- wax paper in a 9x12-inch piece (artist tracing paper or tissue paper works, as well)
- 28- inches of ribbon (maybe more if your containers or jars are large)
- Craft glue or a glue gun (I used Aleene's All Purpose Adhesive)
- Pinking shears or decorative scissors that can cut through felt
- Tweezers
The text pattern I used is available for you here. If you would like more words for your labels, I created these in a word document at font size 50.
Step One: Print the text pattern and transfer it to the wax paper with a fine tip marker.
Hi, I'm Kristen! I am a lover of all things stitchy and crafty. I have been sewing for as long as I can remember. My grandmother taught me how to sew Barbie clothes when I was young and I have been sewing ever since.
You can find me at Bobbypin Bandit, on Instagram, and my Etsy shop.
April 18, 2014
Giveaway and review: My Rag Doll
Hi, I'm Jo - I feature new embroidery patterns Sundays on Feeling Stitchy. I also post on our Twitter and Pinterest.
Is there a new pattern you'd like us feature? Email me!
April 16, 2014
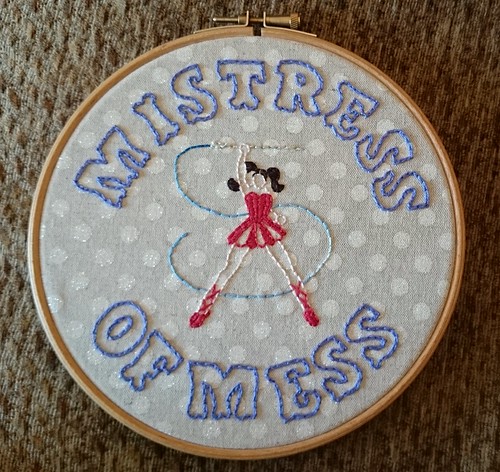
Mistress of Mess

I cannot believe that LittleLixie nailed my personality so well. What? Don't judge...So, this may not have been made for me, it definitely captures my attitude toward creativity. I love the lettering and the woman in the piece. Wear that Mistress of Mess with pride!
April 8, 2014
Tutorial Tuesday
Hi, I'm Kristen! I am a lover of all things stitchy and crafty. I have been sewing for as long as I can remember. My grandmother taught me how to sew Barbie clothes when I was young and I have been sewing ever since.
You can find me at Bobbypin Bandit, on Instagram, and my Etsy shop.
April 4, 2014
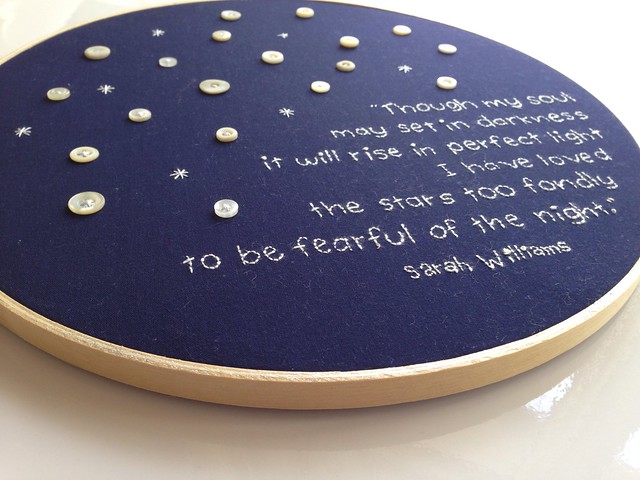
Sarah Williams poem

Stitched by aimee d
This gorgeous poem by Sarah Williams, as stitched by Aimee is just amazing. I am so moved by its simple beauty, and how just a few buttons and one color of thread can be so lovely. Beautiful work!
Hi, I'm floresita, editor of Feeling Stitchy. I'm an avid stitcher, knitter, and crafter. You can see more of my stitching on Instagram and my blog. My vintage transfer collection is on Vintage Transfer Finds.
Feel free to email me with any ideas for the blog!


