January 30, 2014

From Viana with love and cork

Olá! Today I'm continuing from last week's post showing the incredible work of Teresa, from Artesaté, that recreates the Portuguese traditional embroidery of Viana do Castelo, from the Minho region.

Tradition says that the embroiderer must use a cotton thread in blue, white and red. And Teresa uses blue, white and red... but the shining of Viana's jewelry inspired her to use gold, too..

Tradition says that the embroiderer must use cotton and linen fabrics... but the need of modernizing her work inspired Teresa to use felt and, lately, cork fabric, too...

Tradition says that the embroiderer must use hearts, japoneiras, oak leaves and clover leaves as motifs (among others)... but lately the embroiderers have forgotten the leaves... and Teresa, inspired by her wish of being faithful to the genuineness of Viana's embroidery and her permanent desire of knowing more and more, recovered the clover and oak leaves in her stitching, too.


Blue, red and white, the most traditional colors in Viana do Castelo Embroidery.


Teresa argues that the impressive presence of gold jewelry in her home city, Viana do Castelo, was the main influence on her choice of using metallic threads in her embroidery.

Born 100 years ago, the "modern" Embroidery of Viana do Castelo, suited for home linen, is now subject to a certification process that requires the respect of some rules which dictate the non use of golden thread. However, more than 100 years ago, the embroidery tradition was deeply rooted in this region, with a widespread use of wool yarn to embellish women's costumes: skirtspouches and waistcoats. As you may confirm if you follow the links, this embroidery was profuse in the use of color, including metallic threads. Today these threads are not common, with the exception of their use in embroidered boxes, very popular in Viana do Castelo.


In gold, inspired by the rich jewelry.

The choice of the clover and oak leaves as well as the use of cork are the latest innovations in Teresa's work. And the photos I bring are very recent...

In the traditional embroidery from Viana do Castelo, clovers were popular patterns. Seventy or eighty years ago there were three and four-leaf clovers and their size varied greatly, but nowadays the clovers are rare and very small. In the past, the patterns inspired by nature were stylized by the embroiderers from the Minho region. Driven by emotion, while creating a clover, the embroiderer could not resist to draw it by the joining of three or more hearts, reinventing once and again the love pattern. And that's what we find on the last embroidered heart by Artesaté, that uses this lately recovered motif and the blue from Viana's ocean.


At the top the three-leaf clover, joining three hearts

It may sound unexpected but Teresa feels that Viana's embroidery and cork, being both famous symbols of Portugal, make a unique combination of textures and colors. It's natural that her words about the joy of embroidering on cork fabric may be overstated due to the excitement of a new love, but still they are worth being translated:

"It's a slow job that needs more attention. Stitches must be perfect at the first attempt, there is no space for errors once if you need to undo your stitching the cork fabric will be damaged. But the final work is special, more perfect, of a smoother texture to the touch and more rustic in appearance, which fits in perfectly with the tradition that I intend to transmit. The smell of cork fabric is one of the things that pleases and fascinates me the most, it spreads through the office making me feel that I'm working with nature and tradition."


In white, like tradition dictates... And recovering the oak leaf (at the top) forgotten in recent years.

Knowing how Teresa works, I'm already curious to see where this unique combination of tradition, innovation and love for Viana will take her...

January 29, 2014

Sublime Floss Giveaway!


Guess who has a lovely set of Sublime Stitching's new floss colors to give away? WE DO! Want a free pack of Jenny's all-new beautiful floss?


Leave a comment on this post with your favorite floss name pictured above by Friday, January 31, 9PM CST, for a chance to win. This giveaway includes our international readers as well.

My favorite floss name is Bougainvillea - that's a mouthful! :) Thanks, Jenny!

Edit 1/29/14: Comment problems? I just noticed the Disqus comment thread is not showing up for me. If you can't leave a comment, email me your entry! Tell me the browser you're using, and your favorite floss name.

Edit 1/31/14 - The giveaway is closed, winner announced soon!

Hi, I'm floresita, editor of Feeling Stitchy. I'm an avid stitcher, knitter, and crafter. You can see more of my stitching on Instagram and my blog. My vintage transfer collection is on Vintage Transfer Finds.

Feel free to email me with any ideas for the blog!

January 28, 2014

Tutorial Tuesday

Happy Tuesday, everyone!

Today's tutorial is for a quick Valentine's Day project. I simply love Valentine's Day and enjoy making a little something to give to my friends each year, even if they roll their eyes at me. This year is no different, and I thought cupid's arrows would be a good way to spread the love.


To make a cupid arrow, you will need:

- Felt in red and pink, or any colors of your choosing
- Embroidery floss
- Embroidery needle
- scissors
- safety pin


Step One: Print out the cupid arrow template and cut out each shape. Use the template to cut two of each shape out of the felt. I used red and pink, but feel free to mix up the colors.


Step Two: Place the two rectangular pieces together and sandwich them between the two pieces of the tail, or fletching, of the arrow. Use a contrasting floss color, run the needle through the center of the felt pieces to hide the knotted end, and stitch down the center of the arrow tail with a running stitch. Make sure to stitch through all the layers of felt. 


Step Three: Use running stitches at an angle along both sides of the tail to make it look like arrow fletching. Again, make sure to stitch through all the layers of felt. As you can see in the photos below, I didn't measure or mark where these stitches would go, and my stitches are a little uneven and crooked. If you prefer straight stitches you can use a water soluble pen to create stitching marks, then dab them away with a wet cloth. When finished, hide the knot at the end of your floss in between the two pieces of felt. 


Step Four: Place the opposite end of the arrow between the two heart-shaped pieces of felt. This will become the arrowhead. Pin this in place to keep it aligned. Pull the thread with floss between the two heart pieces to hide the knot, and use a running stitch along the whole outer edge of the heart to attach them and enclose the rectangle. Hide the knot at the end of the floss in between the pieces of felt. 

*I decided to trim off a bit of the rectangle here, shortening it by about 3/4 of an inch. You can trim it to the length of your liking, or leave as is. 


Your arrow should look something like this.


Step Five: Use floss in a contrasting color, and create a blanket stitch along one long edge of the rectangle between the arrowhead and the tail/fletching. 


Pull the needle through the rectangular pieces and blanket stitch the other side. Hide the knotted end of the floss between the pieces of felt. 


Step Six: Take the safety pin and place it in the middle of the back of the rectangle. Attach the safety pin to the felt by carefully stitching to the back piece of felt. Make sure not to pull the stitch through both layers of felt. 


Step Seven: Your arrow is ready to be pinned to a jacket or shirt.


Hope you enjoy and are able to give this tutorial a try!

Hi, I'm Kristen! I am a lover of all things stitchy and crafty. I have been sewing for as long as I can remember. My grandmother taught me how to sew Barbie clothes when I was young and I have been sewing ever since.

You can find me at Bobbypin Bandit, on Instagram, and my Etsy shop.

January 26, 2014

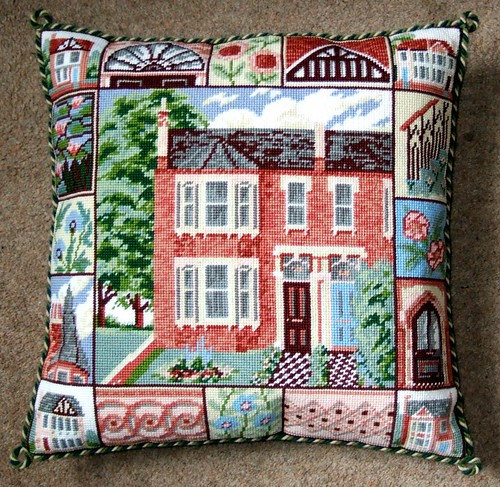
Patterns: Victorian House Cushion

Victorian House Cushion

Victorian House Cushion stitched by Ann Rowley

I love the detail on this Victorian House Cushion designed by David Merry. I love designs that can look old fashioned yet modern at the same time! And with the way how the main design is bordered by smaller designs, it makes it much less daunting to stitch up to!

Hi, I'm Jo - I feature new embroidery patterns Sundays on Feeling Stitchy. I also post on our Twitter and Pinterest.

Is there a new pattern you'd like us feature? Email me!

January 23, 2014

From Viana with love

Olá! Today I bring you something very special... Definitely this is a Portuguese story... And as we would say in Portuguese: a história de uma mulher do Norte - "the story of a woman from the North"...

Sometime ago I told you how the Traditional Embroidery of Viana do Castelo was so intricately interwoven with the story of many women. And how the birth of what we recognize today as this regional embroidery helped so many of them find a new way of life - that is still deeply rooted in the culture and the traditions of the North of Portugal.


Teresa embroidering and wearing the domingar costume (to be used on Sundays)

The story of Teresa, that I bring you today, bears some resemblance to the one I told you before. This is also a love story for Viana and again a proof that with courage and talent we can change our lives.


An original Christmas crib winner of a contest promoted by the municipality of Viana do Castelo

Teresa was born in Viana do Castelo and the traditions, the culture and the folklore of this region were always present in her daily life since she was a little child. As happens with other women and men from this city, Teresa waited, and still waits, all year for the festivities dedicated to Our Lady of Agony, Romaria da Senhora D’Agonia, one of the most rich and genuine ethno-folklore festivals of our country. These are special days, when Teresa proudly wears the folk costume made by her own hands and holds the famous gold jewelry while the colorful folk dance groups musically enliven the ambiance and invite everybody to dance (be sure to follow this last link and watch how common people follow the dancers and fully enjoy it).


An embroidered brooch inspired by the skirts of folk costumes

Embroidery came into her life, by the hands of her mother, so naturally as all the other cultural traditions from Viana did. Inspired by the lively colors of the costumes - the bright red, the shining gold - and by the embroidery that decorated the linens of the house where she was born, Teresa discovered this new way of living. After some years teaching arts and technology to children she decided to devote her life to reinvent Traditional Embroidery of Viana do Castelo creating embroidered accessories that adorn our days: key holders, brooches, small cushions, beautiful frames, wedding favors...


Details of Teresa's stitching

Viana é amor, a popular saying that means "Viana is love", justifies the massive presence of Viana's heart in the crafts and culture of this city. That special heart is everywhere... In the noble art of filigree, in gold jewelry works, in embroidered table linen. For many, the heart of Viana even became one of the symbols of Portugal. Teresa elected the Viana's heart as the symbol of her work - Artesatébecause in Viana, quem gosta vem, quem ama fica - the one who likes comes, the one who loves stays.


Viana's heart - the symbol of Artesaté's work


Teresa feels that her life is unique and special because she was born there, in that special place, where the river meets the sea under the eyes of the hill of Santa Luzia. And Teresa, believe me, has developed the art of bringing to each piece of her work this uniqueness that only someone who belongs to a special place may have... Each stitch tells a story of joy, color and love...


Viana in gold

"Viana is more than a city, it's a way of living... a way of being that lies deep in the soul and the blood of those who were born there..." These are Teresa's words and she reinforces; "That's what I am".

Note: While writing this post I was thinking about how our culture and traditions are such a supreme form of richness that we must preserve for our own good and for the future happiness of our children. Portuguese history and the story of so many Portuguese women are the living proof of this...

January 19, 2014

Patterns: mmmcrafts


Photos from mmmcrafts Flickr

You know how certain things always seem to pop up on your Pinterest? Well the little bird on the left (a bookmark) has popped up so many times on the boards of people I follow on Pinterest, over the last week or so, I just had to investigate who this brilliant designer was further!

It turns out that the bookmark was made by the creative spark behind mmmcrafts and although the bookmark doesn't seem to be a pattern, you can find loads of other mmmcrafts patterns here and here. I particularly like the Flora needle book and the snow bird  patterns. Flor, the editorial brains behind Feeling Stitchy, also really likes the snow bird pattern, she's made loads!

Hi, I'm Jo - I feature new embroidery patterns Sundays on Feeling Stitchy. I also post on our Twitter and Pinterest.

Is there a new pattern you'd like us feature? Email me!

January 16, 2014

Beautiful key chains from Portugal

Olá! Today I'll continue on last week's Portuguese blog, cesto da roupa, from the hands of Isabel Jardim. And this week I tried to learn a little bit more about Isabel's relationship with embroidery...

Like many of you (I believe...), Isabel's first stitches were at school, embroidering perforated cards.
Her love for embroidery is an old love. And for a long time she embroidered and sold many, many commemorative (birthday, marriage...) cross stitch works.

Winter look...
She likes to see motifs gaining color and volume. Often she does not use a pattern, especially with floral motifs - Isabel embroiders freely, until the whole piece looks balanced and harmonious... and she certainly has a gift for creating charming flowers!

In blue...

As the photos of last week show, she believes that a small embroidered detail makes a piece of work really unique!

Pastel...
I decided to keep these photos for last, since I'm completely crazy about them... These key chains won my attention when I saw them in a craft fair and I decided that I had to show them here...

So delicate...

I was not expecting it to be so difficult to choose the photos... I like each and every one of them...

Red, red, red...

Green and pink...

Do you know what Isabel's family name, Jardim, means in Portuguese? It means "Garden"... and that's what this post looks like!!!

January 15, 2014

Waiting For Spring

waiting for spring..
Even though we are in the middle of winter and the temperatures are frigid, I can't help dreaming of spring. Firuzan Goker's mixed media "Waiting for Spring" is just what I needed. It is a beautiful reminder that that spring is just around the corner and flowers will be blooming. 

Kate & Rose Winner!

Bewitching Botanticals by Kate & Rose

The random number generator has spoken in our Kate & Rose giveaway!


Which is Meghan! Meghan wrote that she would like the Faraway Garden pattern set to put on a shirt. Congratulations! We'll be in touch shortly to pass your details on to Kate & Rose.

Thank you again to Kate & Rose for allowing us to do this giveaway!


Hi, I'm Jo - I feature new embroidery patterns Sundays on Feeling Stitchy. I also post on our Twitter and Pinterest.

Is there a new pattern you'd like us feature? Email me!

January 14, 2014

Tutorial Tuesday

Happy Tuesday, everyone!

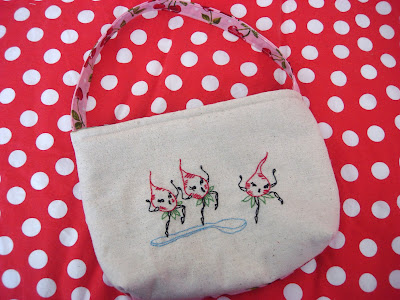
It's a new year and many have us have committed to resolutions and goals. If any of you are like me, there has been a renewed commitment to eating healthy in the new year. Especially after eating one too many cookies over the course of the holiday season. In the spirit of being healthy in the new year, today's tutorial is for a lunch tote, stitched with vintage dancing radishes to remind us to eat our veggies!


To make this lunch tote, you will need the following supplies:

- Embroidery hoop, floss, and supplies
- Embroidery pattern (radish pattern available here)
- Two pieces of exterior fabric cut 13-inches wide by 10-inches high 
- Two pieces of interior fabric cut 13-inches wide by 10-inches high
- One piece of fabric for the strap cut 4-inches by 19-inches
- Two pieces of batting or Insul-Bright 
- Sewing machine and thread
- scissors 
- Iron and ironing surface


Step One: Transfer the pattern to fabric, making sure to center it in the middle of the 13x10-inch piece of fabric. I found this radish pattern here. I apologize for not being able to find the root link to the original of this pattern. Once your pattern is transferred, stitch in the floss colors of your choice. 


Step Two: Trim the embroidered exterior piece, the plain exterior piece, and two pieces of batting/insul-bright to 13-inches wide by 10-inches tall. Create a sandwich of batting with the two exterior pieces, right-sides facing, in between the two pieces of batting. 


Step Three: Stitch a 1/2-inch seam along the three sides of the batting and exterior pieces, leaving the top open. 


Step Four: To create a square bottom for the tote, take one of the bottom corners and press the seams against one another to create a triangle. Mark 1.5-inches from the point of the seam, and stitch straight across the bottom of the triangle. Clip the excess fabric. Repeat for other corner. Turn inside out and set aside.


When you turn this piece inside out, it should look like this. 


Step Five: Take the two interior pieces of fabric, trimmed to 13 by 10-inches, and place them right sides together. Stitch a 1/2-inch seam allowance along the three sides leaving the top open, and leaving a 2-inch opening at the bottom seam in order to turn it out later. 


Step Six: Just as we squared the bottom of the lunch tote exterior in Step Four, we'll do the same for the interior here. Take one of the bottom corners and press the seams against one another to create a triangle. Mark 1.5-inches from the point of the seam, and stitch straight across the bottom of the triangle. Clip the excess fabric. Repeat for other corner. Set this aside. 


Step Seven: To assemble the strap, fold the 4x19-inch piece of fabric in half, length-wise, and press. 


Then, unfold the fabric, take the two long ends and fold them inward toward the crease that you just created. Press.


Fold this in half, lengthwise, and press again. 


Stitch along both long edges of the strap with a 1/8-inch seam allowance. 


Step Eight: Center the raw short edges of the strap over each side seam of the tote exterior, and pin. Make sure the strap is not twisted. Place the exterior tote into the interior/lining, with right sides facing each other, and pin in place. Make sure to match the side seams with the strap in between the exterior and interior/lining pieces. 

Step Nine: Stitch a 1/2-inch seam allowance along the top raw edge of the tote. 


Step Ten: Using the opening at the bottom of the tote interior/lining, flip the lunch tote out. 


Step Eleven: Press the top edge of the tote, so that the seams all lay flat. Top stitch along the top edge of the tote, making sure to move the strap out of the way. 


Step Twelve: Pull the interior/lining out of the bag, and stitch the opening that we used to turn the bag, shut. 


Step Thirteen: Give the entire bag a final pressing, and your lunch tote is ready!


Hope you enjoy and remember to eat your veggies!


Hi, I'm Kristen! I am a lover of all things stitchy and crafty. I have been sewing for as long as I can remember. My grandmother taught me how to sew Barbie clothes when I was young and I have been sewing ever since.

You can find me at Bobbypin Bandit, on Instagram, and my Etsy shop.

SITE DESIGN BY RYLEE BLAKE DESIGNS