Happy Tuesday, everyone!
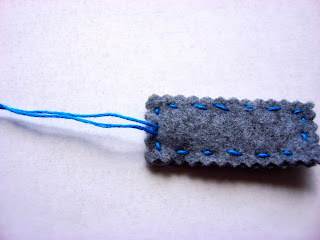
I have a quick and easy tutorial for you today. This idea came to me when I realized I keep losing sight of my embroidery scissors while I am stitching. Does that ever happen to you? Well, a little handy dandy tassel and some stitched felt has helped me keep better track of them, and I hope it will help you, too!
To make your own embroidery scissor stitched felt & tassel, you will need:
- One skein of embroidery floss
- Two small pieces of felt (3x2inches long, we'll be trimming it down)
- Pinking shears
- Scissors
- 30-inch long piece of embroidery floss to accent the tassel
- 3.5-inch wide piece of cardboard
- Embroidery supplies (floss, scissors, needles, etc.)
- I free handed some flowers, but feel free to use my little sketch as a pattern
Step One: Using pinking shears, trim the pieces of felt down to 2.5-inches long by 1-inch wide. Stitch some little flowers on one piece by holding the felt taut in one hand. If you don't want to stitch flowers, I think an initial would be cute, too or your favorite stitch, maybe a few wheatear stitches. It's totally up to you!
Step Two: Once you have your stitched piece of felt finished, place it on top of the blank piece of felt. Using an accent color of floss, attached the two pieces together with a running stitch. Make sure to hide the knotted ends of the accent floss in between the two pieces of felt.
Step Three: Cut a 4.5-inch piece of floss and pull it through the top of the back side of felt to create a loop. Knot the ends together. This will be how it hangs from the scissors.
Step Four: To make the tassel, take one skein of embroidery floss and wrap it around a 3.5-inch piece of cardboard or thick card stock (I used a small notebook). Make sure the cardboard or card stock does not bend or curl as you wrap the floss around it. When finished, gently pull the skein off the cardboard.
Step Five: Beginning at 0.5-inches below the top of one loop, wrap the 30-inch piece of floss around the skein multiple times and tie the ends in a tight double knot.
Step Six: Using large scissors, cut through the loop of floss opposite the wrapped end. Trim any uneven ends and trim the ends of the floss used to wrap the top loop.
Step Seven: Take a 4.5-inch piece of floss and run it through the top loop of the tassel. Knot the ends.
Step Eight: Take the tassel and stitched felt piece and attach them to the handle of your scissors using a lark's head knot.
Now your scissors will be easier to find when they slide away from you. Hope you enjoy!
Have a happy Tuesday!


I love it! So cute!
ReplyDeleteThis site gets me so excited to stitch! Thank you :)
ReplyDeletePretty and easy .Thank you for the tutorial.:)
ReplyDeleteSo cute! I love this site. Its very inspiringe, greetings from Poland:))
ReplyDelete