Pages
▼
April 30, 2013
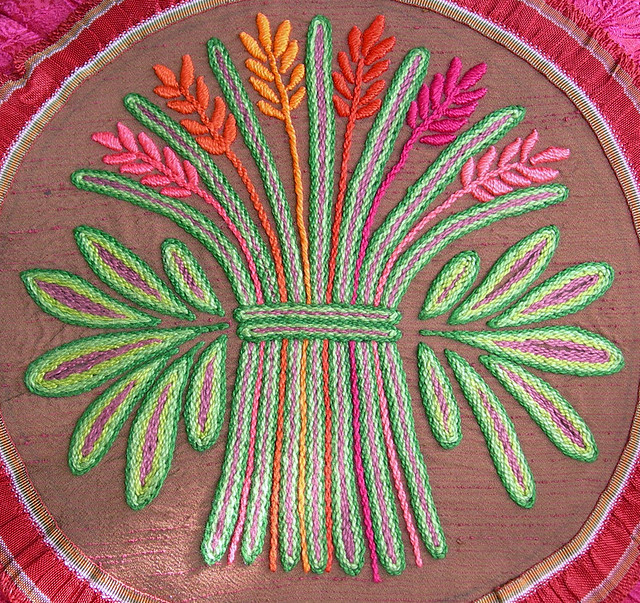
Gorgeous stems
stitched by Robyne Melia
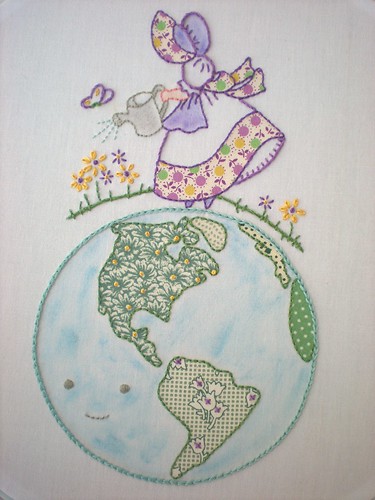
I'm fascinated by the colors and texture in this bright, lovely piece. This beautiful design is based on a butter stamp and was stitched by Robyne Melia. Robyne was also sweet enough to include a drawing of the design in her blog post - for more on this gorgeous project, visit her blog. Gorgeous work, Robyne!
April 29, 2013
Laying Tool Review and Giveaway!
Hi guys! Remember this lovely doodad I showed you last week? The folks at JR Crafter sent me one of their Best Laying Tools to try out and I'm ready with a full report for you!
First of all, if you've never used a laying tool, it takes a bit of time to get used to, and like any skill, you get better with practice.
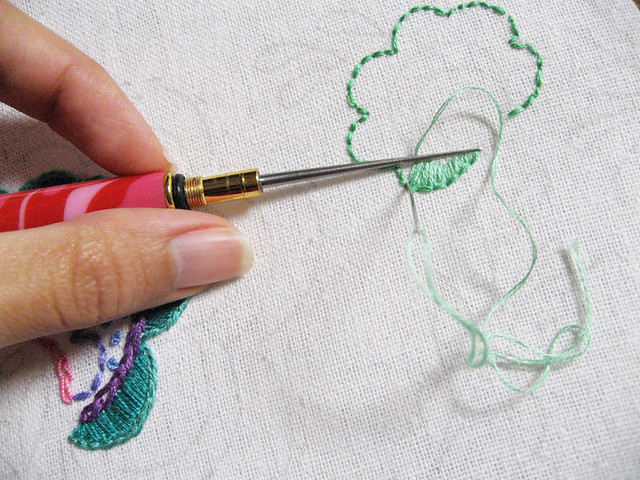
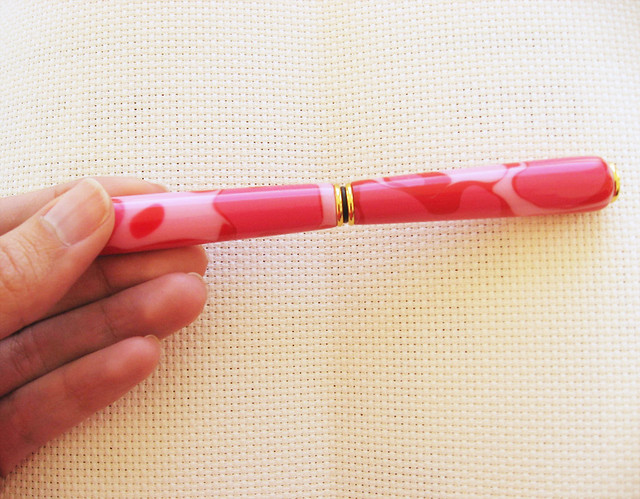
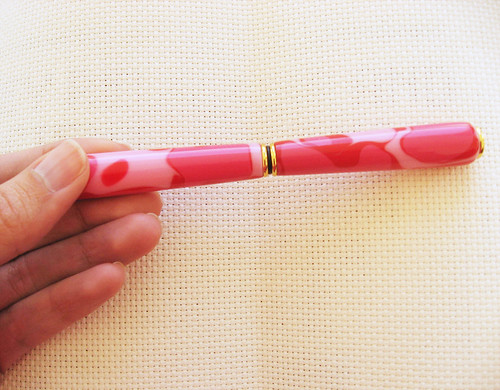
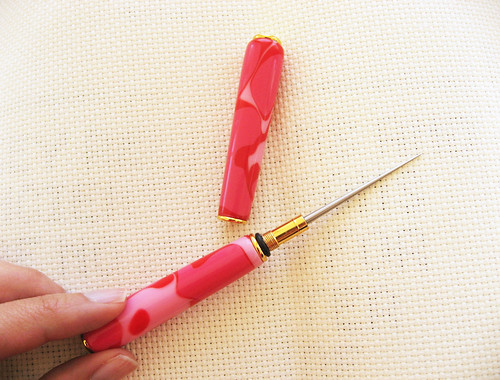
I like that this tool is lightweight and easy to hold - it's the width and length of a pen, and quite pretty, as well.
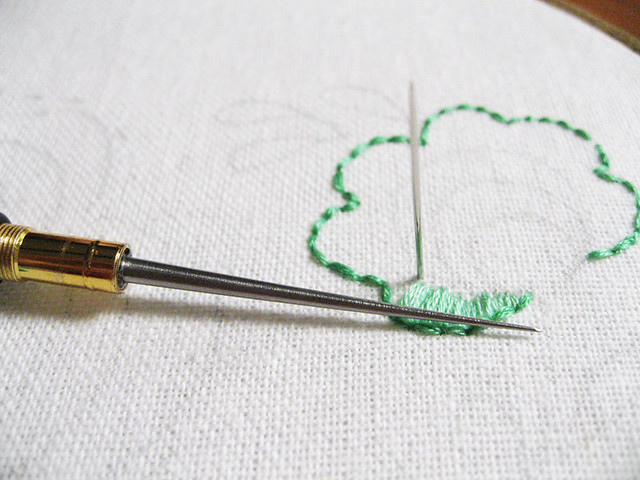
The end is wicked sharp - here it is next to my needle, for comparison:
That said, even with my slightly clumsy paws and the smooth acrylic finish on my tool, I managed not to stab myself. I'd take Mary Corbet's advice and use a floor stand for embroidery, to leave both hands free. I did okay by resting my hoop on the edge of a table and just sort of finagling it.
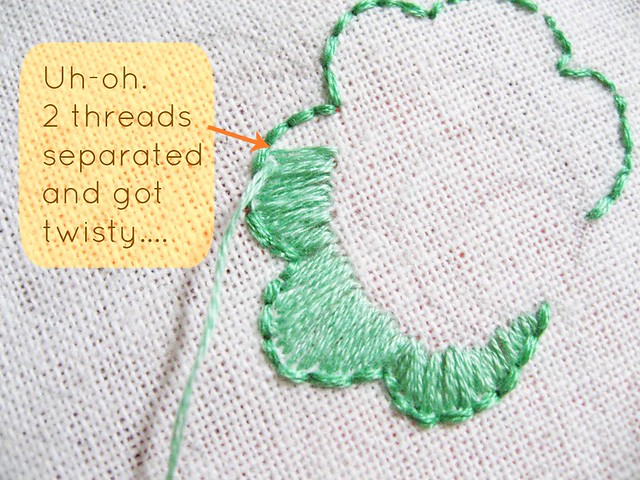
I tried the laying tool on a section of Satin Stitch - in these photos I'm using 2 strands of embroidery floss. First I stitched without the laying tool, as I normally do - and you know what happens - sometimes it works fine and sometimes the threads get all twisty, separate-y, and just plain sad:
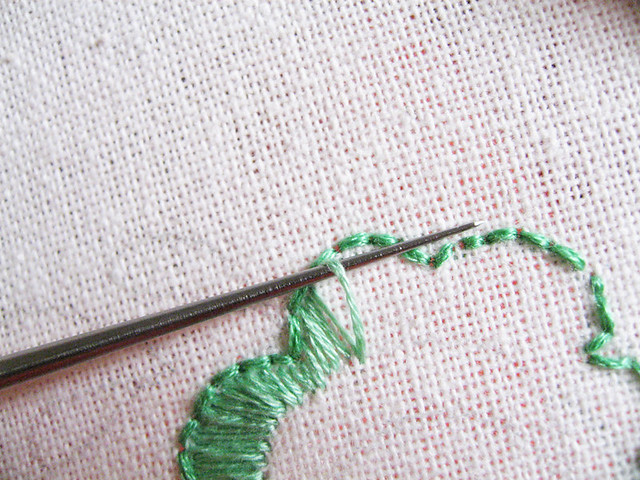
Laying tool to the rescue!
I realized that in the past, I was already using my needle unconsciously to do this - tugging out and straightening the twisted threads after I'd stitched them so that they'd lay flat. Tugging at threads after the fact is touch and go and many times I grumpily have to re-stitch it.
With the laying tool, I had none of those problems - you use it to hold the threads taut and straight while you're pulling them through, so there's no last-minute twisting, separating, or bumps. Yay! When I get better, I'd like to try it on stem stitch, another stitch that frustrates me at times.
This laying tool really is a pleasure to use - since it's the length and width of a pen, your hands already have a pretty good idea of how to handle it. When you're done using the tool, the top screws on nice and tight to keep you safe and the tip nice and sharp. If your satin or stem stitching makes you grumpy, I'd say it's definitely worth a try. I mentioned Mary Corbet's helpful post on laying tools before, but I'll plug it again because her photos and video tell you everything you need to know about how to use this lovely thing.
And now for what you've been waiting for huh - the giveaway! Not only is this a great-looking, easy-to-use tool, it comes in SO MANY lovely configurations. Well you know what? One of you lucky peeps will be getting the laying tool in the color combination of your dreams, thanks to the wonderful people at JR Crafter!
To win, check out all the beautiful colors and finishes on their website. To see what they look on the actual tool, click over to their Etsy store for some nice photographs. Leave a comment on this post with your favorite color, by 9 PM CST, Friday, May 3, when I will draw a random winner.
My color combo is "Pink Cloud," if you like mine. But, hey, maybe you're not a pink acrylic fan - to each his/her own - let's hear your favorites!
April 28, 2013
Patterns: Crafty Magazine
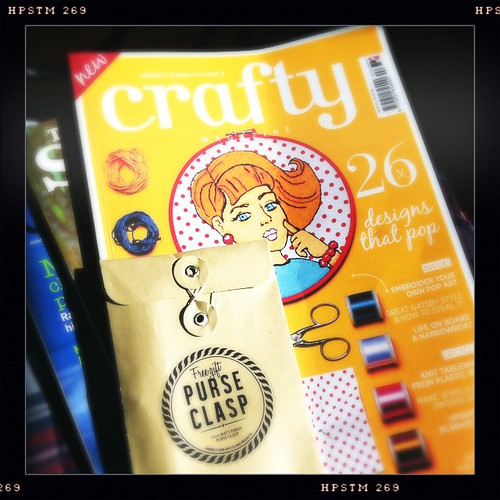
Something slightly different this week; there's a new craft magazine in town (in the UK at least, not sure if it's elsewhere yet), called Crafty and I particularly love issue 2 because it has a fantastic embroidery on the front cover by none other than Cherry and Cinnamon, aka Bridgeen Gillespie, who you may remember did the fantastic Kitsch Witch pattern for Feeling Stitchy last October.
The Roy Lichtenstein inspired embroidery is constructed out of felt and there are detailed instructions inside the magazine on how to create your own. I particularly like the two thought bubbles, in their own individual smaller hoops (not shown on the front cover) which go with it.
Crafty Magazine has a refreshingly different take on the craft resurgence, it has a more urban feel than other craft magazines, the projects look fairly cheap to do but at the same time are the sort of thing you'd want in your home or to wear and there's a nice emphasis on upcycling. Embroidery has featured in two out of two issues so far (also in this issue there's a piece on embroidering vintage postcards) and there's even a monthly column from Mr. X Stitch. Definitely worth a check out at your local newsagents or on your iPad (there's an app).
S is for Stitch winner!
Thank you everyone for your responses to the S is for Stitch competition, it was really fun reading what everyone has been stitching for the little ones in their lives or what they would like to stitch. I plugged the numbers into the random number generator.
And counting from oldest to newest, the winner was Tracey Mayo! Congratulations!
Tracey, can you contact either me (Jo) or Floresita with your address (you can find our emails on the Email Us page on the Feeling Stitchy blog) and we can sort out getting your prize to you!
April 27, 2013
New Embroidery with Vintage Patterns, April round-up + good-bye
Hi everyone! As usual I'm back again on the last Saturday of the month. However, this time, instead of sharing an interview with you I'll be saying my good-byes. I've been honored to share interviews & stories with you about the stitchers in the New Embroidery with Vintage Patterns Group who keep vintage embroidery patterns alive by creating new embroideries with them. Feeling Stitchy has been a great platform to share the vintage stitchy love with everyone and I'm so glad to see that many new people have joined our group and have become smitten with vintage embroidery patterns! However, my non-stitchy hobbies are occupying more of my time right now so I need to step down from the responsibility of my monthly posts here. I really hope y'all have enjoyed reading the interviews I have shared. As always, I invite you to join our New Embroidery with Vintage Patterns group -- other group members will take on the task of organizing monthly stitch alongs for everyone to participate in! This isn't a forever good-bye, it's just a see you later ;)
Thanks again for reading my monthly posts!
♥Beth
Here are some of the beautiful stitcheries that were done for the April SAL.
Thanks again for reading my monthly posts!
♥Beth
Here are some of the beautiful stitcheries that were done for the April SAL.
April 25, 2013
Cotton Pearl With Portuguese Soul
Olá! In the last few weeks I’ve been talking about Guimarães Embroidery... And this week I will not be far from this Portuguese town.
Some years ago a very popular embroidery floss brand was still working in Portugal, they had a mill in the North of Portugal, but it was transferred to another European country. So, as far as I know, the only embroidery floss made on Portuguese soil is this one…
I couldn’t say better… Simple but effective…
In my kits usually I work with crochet thread sizes 12 and 6… I love the final work of the size 6 thread and for those that are learning to embroider I believe it is easier to use a thicker thread. And of course… crochet thread is less expensive than embroidery thread…
These threads are available in the Agulha não pica Etsy store.
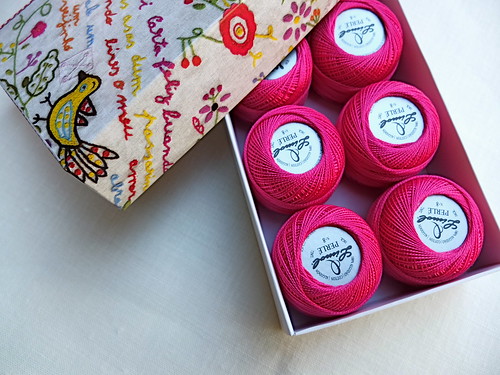
When I was taking the first steps in my agulha não pica’s project, I was determined to use Portuguese floss in my embroidery kits… At that time I discovered Limol, a manufacturer of 100% cotton yarns for crochet, hand knitting and embroidery purposes. And do you know where they come from? They are based in Ronfe, near Guimarães!!
Pink Limol Pearl size 8, my photo |
Some years ago a very popular embroidery floss brand was still working in Portugal, they had a mill in the North of Portugal, but it was transferred to another European country. So, as far as I know, the only embroidery floss made on Portuguese soil is this one…
Although many of you still think that “Madeira” floss is made in Portugal that is not true… Madeira threads have nothing to do with Madeira Island nor even with Madeira Embroidery… I was repeatedly asked about this and some weeks ago I contacted the manufacturer and I was kindly informed that: “Actually there is no real relation between our company, the island and the embroidery. A long time ago the former owner was searching for a name for his embroidery threads company and named it after the famous Madeira embroidery. Very simple but effective.”…
I couldn’t say better… Simple but effective…
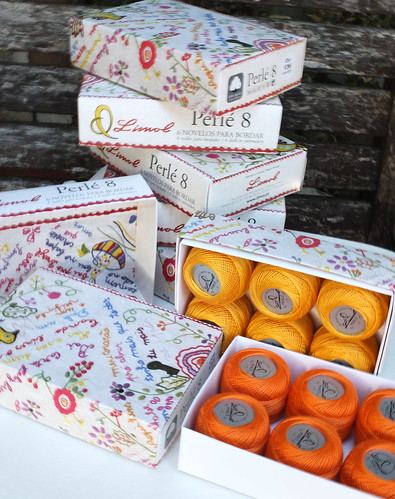
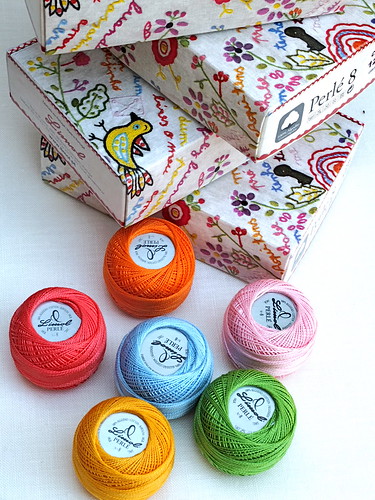
Charming boxes of Limol pearl size 8, my photo |
In my kits usually I work with crochet thread sizes 12 and 6… I love the final work of the size 6 thread and for those that are learning to embroider I believe it is easier to use a thicker thread. And of course… crochet thread is less expensive than embroidery thread…
But for a long time I wanted to try Limol’s cotton pearl (in Portugal we say perlé) size 8, created for embroidery works. Last week I visited them in Guimarães and bought some boxes of this embroidery floss. The boxes are beautiful, inspired by fiancé kerchiefs embroidery, what made me even happier about choosing this thread.
This cotton pearl is a long staple cotton fiber with double mercerizing and fine shine and it can be used both in free embroidery and in cross-stitch. The differences between this thread and crochet thread involve not only the manufacturing process but also the raw materials used. Embroidery thread is made of the best cotton quality fibers and the manufacturing process is more demanding, implying double mercerizing.
Limol, a medium-sized Portuguese company, in 1971 began manufacturing 100% cotton thread for crochet. Many years later, the move to always improve the manufacturing process and the commitment to innovation made possible the production of embroidery thread. But as they say, there was another motivation… "The essence of the creation of Limol’s Perlé 8 is the need for preserving the secular tradition of the Bordado de Guimarães” (Guimarães Embroidery).
This thread was very well accepted, they sell it in Portugal and abroad and one of their most important and special clients are Portuguese regional embroiderers, since pearl cotton size 8 is used in Regional Traditional Portuguese Embroideries like Viana do Castelo and Guimarães.
Beautiful colors of Limol Pearl cotton size 8, my photo |
In our country they are famous for their crochet threads but their metalized yarns are very well known, too. Their linen threads are extremely beautiful and recently Trama rústica (rustic yarn) became very popular in knitting works, its rustic look is truly charming...
I was so happy with these new acquisitions. It's great to see that in my country many of us are still working and doing their best to maintain the richness of our embroidery traditions. And I do believe that using thread made in Portugal in our works helps to assure that our Stitches have Portuguese Soul...
These threads are available in the Agulha não pica Etsy store.
April 24, 2013
Craftster's Featured Needlework and Artist
The featured needlework on Craftster this quarter is Fionna and Cake from slientblair. Can I just say, "WOW!" The stitching is this piece is AMAZING! The icing on the cake is that slientblair is AWE-SOME! So stinking nice, I can't stand it! Check it out!
Tell me a little about yourself:
I am a manic crafter. I tend to have several projects going at once to work on depending on mood, location, or child proximity. Therapeutic crafting makes lots of sense to me. I love to try my hand at any and all crafting, but lately my heart is in embroidery.
Tell us a little about the piece:
This is Fionna and Cake from the Cartoon Network Show “Adventure Time”. The purpose for stitching this up was for the “Invite Your Partner Swap, R22” on Craftster.org for my partner QueenofMarigold. I also love to take any opportunity to do studies in texture…
What/Who inspires you:
I’m greatly inspired by nerd/pop culture and things that make me laugh. I love mixing up texture in my stitching for fill-ins and the contrast of textures inspires me for how and where I might do a certain fill.
In real life, my Monday Night Knit Nite peeps. They rule and are priceless for bouncing ideas and advice! (ex: Heather Dreisbach, her color choices and intricate stitching push me to try and impress her. http://pinterest.com/delirium_child/things-i-make/). Online inspire-ateers are so many on both craftster and pinterest I could fill this whole page up! SO many talented people: Averia, KittyKill LimeRiot, Helena Puck, Homerof2…to name a few.
What advice would you give to newbies:
I would say, to not fear a certain fabric or stitch. The fantastic thing about the stitchy-craft is you can rip it out if it’s not working. Experiment with transfer techniques. My favorite way is to tape the image printed out on my window and then tape the fabric over that. I then trace onto the fabric with a water soluble marker…
What are you working on next:
I am just about finishing up a hoopla of Vanellope Von Schweetz “You’re My Hero” Cookie Medal, from the movie Wreck it Ralph.It’s got some felt aspects ala LimeRiot and buttons and thread! Oh, and it's big...I'm using a 12 inch hoop. I usually tend to stick around the 6-8 inchers.
One of the best days of my life is…
This just comes to mind, but I’m sure there are more meaningful ones…
The fateful day was way back in the year 2000. I went to a Zena, the Warrior Princess convention in Phoenix and the speaker was…Bruce Campbell! I got the guts up to get in line to have him sign a meek little scrap of paper, and he was awesomely, good naturedly snarky to me in such a way I carry it to this day. We had a little back and forth about “The Blair Witch Project”, and me not getting as much crap as I should’ve because I share a name with the movie. At least in my opinion, we got to have “a moment”.
The memory will live with me forever!
April 23, 2013
Tutorial Tuesday
Hi everyone! Happy Tuesday!
I have a tutorial round-up for you today, with some great projects ideas and stitching techniques. Hope you enjoy and give one, or all of them, a try!
Do you have a favorite scrapbooking stamp you wish you could embroider? Jennet Mae Jones shows you how over at the Feathered Nest Studio.
If you are like me, you love having embroidery everywhere, including accessories, and sunglasses are no exception. Head over to Honestly WTF, for instructions on how to make your own pair of cross-stitched sunglasses.
If you need a new case for your stitched sunglasses, or would like a cute new pencil case, Gingermelon Dolls has a super cute tutorial. This is a great tutorial to practice your blanket stitch with.
Japanese needlework known as, Sashiko, is gaining in popularity. If you would like to learn how to Sashiko, head over to Saké Puppets for quick lesson.
There are so many amazing tutorials that are available, but these are just a few that I thought you would enjoy.
Hope you have a happy Tuesday!
April 22, 2013
Patterns: S is for Stitch
We were recently given a digital copy of S is for Stitch: 52 Embroidered Alphabet Designs + Charming Projects for Little Ones by Kristyne Czepuryk to try out, it's a really sweet book, the core of which being a series of alphabet blocks, one set for girls and one set for boys, that go together to make two different quilts, full instructions for the quilts included. There's also a colourful rainbow dancer design, made almost exclusively from lazy daisy stitch, a car embroidery for the little boys in your life, toy blocks, a robot cushion and a flower cushion. There's also a nice section showing examples of how you could use the alphabet designs on other objects.
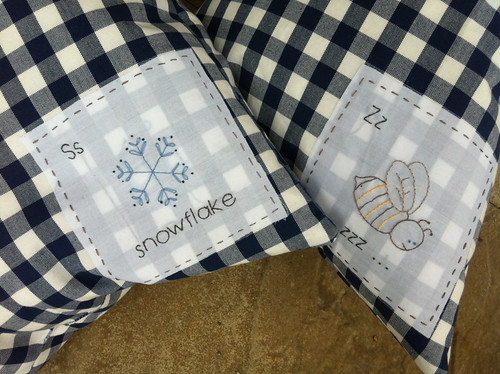
This is a good book for beginners, with a very comprehensive how to stitch guide. There's also a good section on quilting basics. The embroidery designs are bold and simple. This would be a great book for those stitching for young children. Personally my children (7 and 9) are possibly a little too old for the designs in this book, but I still couldn't resist adding some initial patches onto some cushions and I think they look really cute.
Would you like a copy of S is for Stitch? Thanks to the publisher, this giveaway is open to all our readers - just an FYI that a U.S. winner will receive the book by mail and an International winner will win an e-book version.
Tell us what was the last thing you embroidered for the little people in your life or what you'd like to embroider for them, in the comments below. A comment will be picked at random at 10am GMT Sunday 28th April.
April 19, 2013
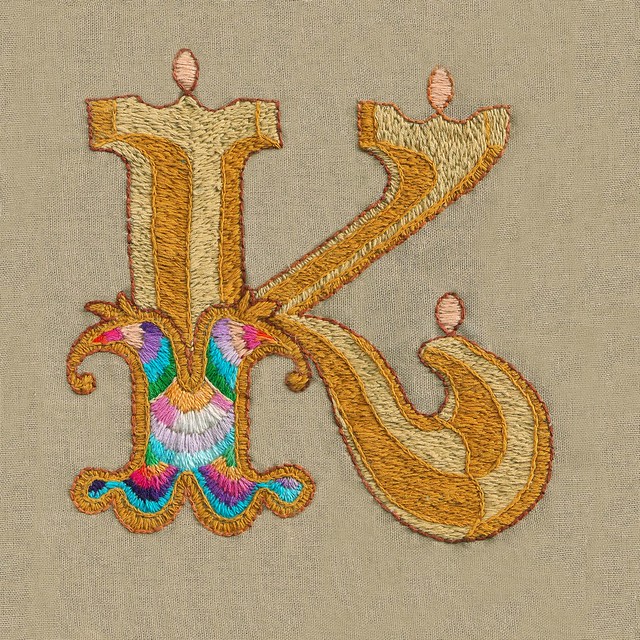
Fabulous K
stitched by Kyle J. Letendre
This fabulous K is described by Kyle as his "first go at embroidery!" Seriously, Kyle, this is amazing work - I think you need to keep embroidering. :)
Read more about Kyle's project on his blog (which is also amazing, by the way).
April 18, 2013
More Guimarães Stitches
Olá! Last weeks I've been talking about Guimarães embroidery. Today I simply bring you two beautiful and charming pieces of embroidery inspired by these regional Portuguese stitches. I seriously recommend that you follow the links and browse the inspired work of these two Portuguese embroiderers...
The first work belongs to Avé Meri. Follow this link and you'll find many more pieces of Guimarães embroidery.
Joana from the blog Jubela is the author of these beautiful stitches. Here you'll find more of Joana's Guimarães stitches.
In other blogs like açafate dos retalhos and donalberta you'll find more...
Até para a semana... See you next week...
The first work belongs to Avé Meri. Follow this link and you'll find many more pieces of Guimarães embroidery.
Guimarães embroidery by Avó Méri |
Joana from the blog Jubela is the author of these beautiful stitches. Here you'll find more of Joana's Guimarães stitches.
Guimarães embroidery from Jubela |
In other blogs like açafate dos retalhos and donalberta you'll find more...
Até para a semana... See you next week...
April 17, 2013
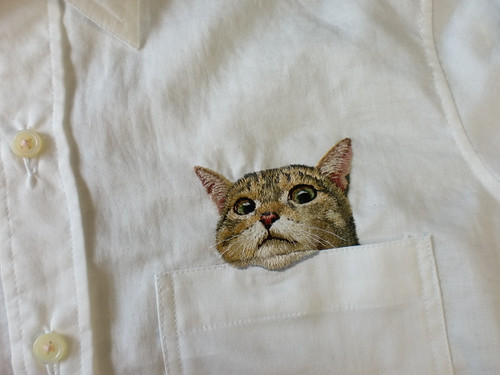
Is That a Kitty in Your Pocket?
Is that a kitty in your pocket or are you just happy to see me? Oh...it's a kitty...I LOVE this little pocket kitty so much! He looks so real. Check out Hiroko's other beautiful embroidery.
April 16, 2013
Lovely Owl
stitched by Handmade and Heritage
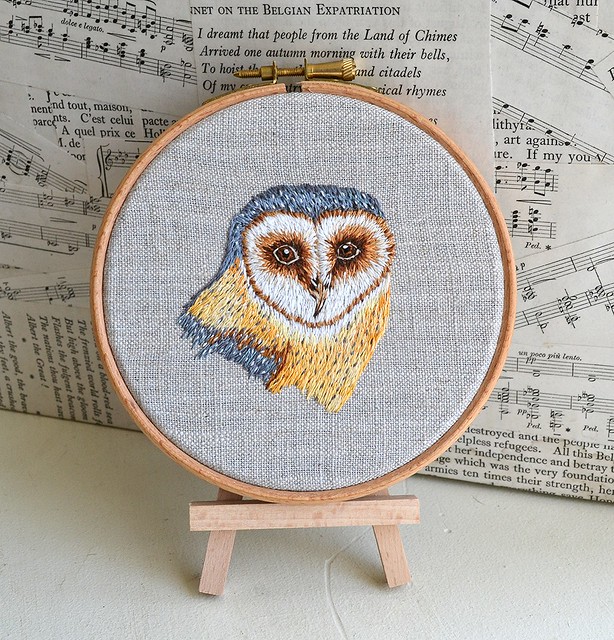
I'm loving this beautiful owl stitched by Amiee - the detail and color and texture are just astounding. So many layers of tiny stitches - beautiful!
April 15, 2013
The Unknowable
stitched by fade theory
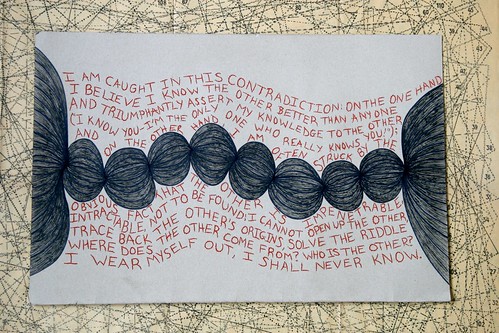
I'm floored by the beauty of this Roland Barthes quote, as stitched by fade theory, which reads as follows:
I am caught in this contradiction: on the one hand, I believe I know the other better than anyone and triumphantly assert my knowledge to the other ('I know you-I’m the only one who really knows you!'); and on the other hand, I am often struck by the obvious fact that the other is impenetrable, intractable, not to be found; I cannot open up the other, trace back the other’s origins, solve the riddle. Where does the other come from? Who is the other? I wear myself out, I shall never know.
—Roland Barthes, from 'A Lover's Discourse'Quoting from Roland Barthes in an embroidery piece? There's really no end to you guys' creativity. Gorgeous work, fade theory!
April 14, 2013
Patterns: Apple Harvest
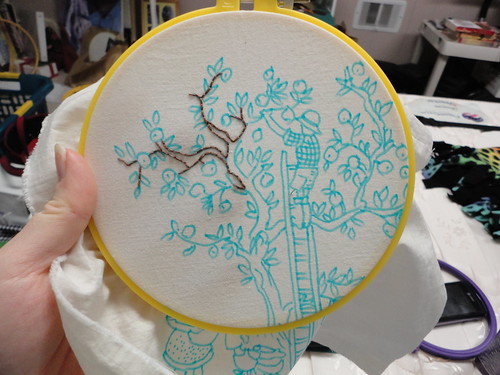
Work in progress - Apple Harvest Embroidery, pattern from Bustle & Sew stitched by happytransplant
Sorry, but I couldn't resist another starting work in progress shot this week, this time it's happytransplant starting out on the Apple Harvest Embroidery pattern from Bustle & Sew. I love being nosy and seeing where other people do their embroidery!
The apple harvest pattern is an old pattern, so doesn't seem to be available at the moment on the Bustle & Sew website, but when's that gonna stop me admiring some good stitching ;)
April 12, 2013
Mystery giveaway teaser...
Some of you may know exactly what this embroidery implement is (no, it's not a pen). Well, you're far more clued in than I was when the lovely folks at JR Crafter contacted me to review their Laying Tool.
What, all these years embroidering, and I'd never heard of it? It happens. :)
So, if you're like me, and have no clue what this lovely doohicky is, or how you might use it, I'm giving you advance notice so you can check out Mary Corbet's extremely helpful overview: What's a Laying Tool.
Because maybe, just maybe, we'll be doing a giveaway of this lovely tool in, oh about a week or so.... :)
April 11, 2013
Guimarães embroidery - from the people, to the people
Olá! This week I'm coming back to Guimarães embroidery... I hope you don't mind :)
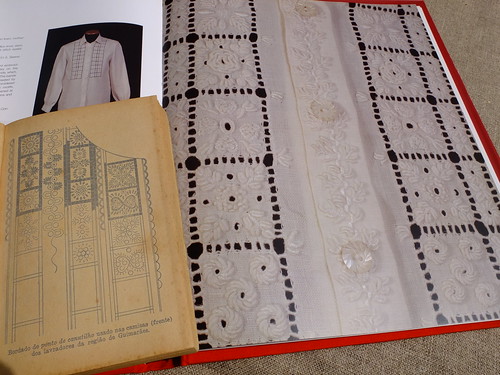
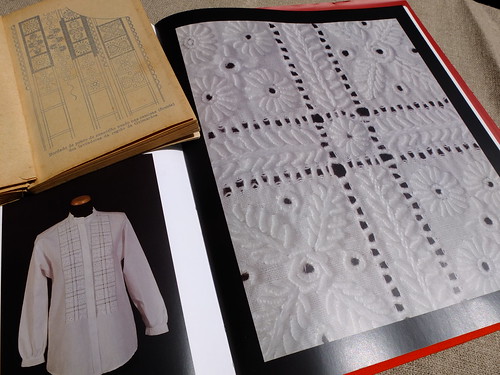
Many years ago the stitches that are known today as Guimarães embroidery were used to embellish the rural woman’s blouse and working tailed waistcoats and the shirt of the farm worker (even richer than woman’s).
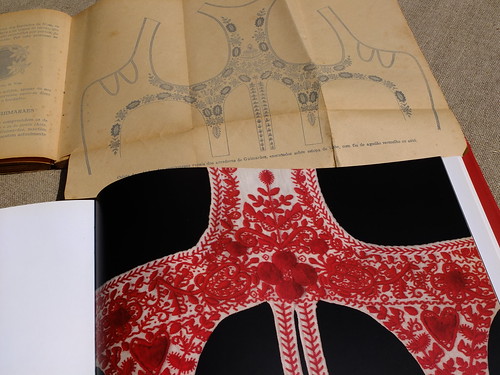
The shirts were worked on thick coarse linen, profusely using bullion knot stitch in quite an original manner. White was the dominant color but in the shirt-front red was also used in some details. The same applied to the tailed waistcoat, on which red, blue, or black were used separately.
This was truly a popular type of embroidery and by saying “popular” what I really mean to say is that this type of embroidery was made by the people, for the people - do povo para o povo.
Experts argue that this “popular” embroidery is the most original regional embroidery in Portugal. The shirts from the peasants “give us the impression of something absolutely different” from any other Portuguese or other countries’ regional embroideries.
Maria Clementina found the right words to describe it:
“of such graceful design and so beautifully embroidered that it could easily compete with a more aristocratic piece. Many peasant embroideries, made for personal use and not for sale, are so carefully worked as to be technically perfect. This works is done during the short intervals between their heavy labor in the fields and in the home, with the loving care bestowed on work destined to last several generations.”
Today, Guimarães embroidery is used in tablecloths, valances, napkins, doilies, sweetheart’s handkerchiefs and many other pieces that embellish the home, and also in accessories for ladies and children. This work begun in the middle of the 20th century, adapting shirt’s motifs to house linen. Unlike the popular embroidery from which it stems, it is not made by the people, for the people, once it is executed by professional embroiderers. As it is very time consuming it became expensive, not accessible to all purses, ending to be a ”rich embroidery” ...
But we have good news… The interest in learning traditional stitches from Guimarães is growing and we hope that, soon, it will return to “the people’s” hands…
*In this post I've used four books on Portuguese embroidery - Traditional embroidery of Portugal; Guimarães Embroidery - a renewed tradition; Bordados e Rendas de Portugal; Embroidery and lace in the house linen of Entre Douro e Minho
Many years ago the stitches that are known today as Guimarães embroidery were used to embellish the rural woman’s blouse and working tailed waistcoats and the shirt of the farm worker (even richer than woman’s).
The shirts were worked on thick coarse linen, profusely using bullion knot stitch in quite an original manner. White was the dominant color but in the shirt-front red was also used in some details. The same applied to the tailed waistcoat, on which red, blue, or black were used separately.
Farm worker shirt. |
This was truly a popular type of embroidery and by saying “popular” what I really mean to say is that this type of embroidery was made by the people, for the people - do povo para o povo.
Experts argue that this “popular” embroidery is the most original regional embroidery in Portugal. The shirts from the peasants “give us the impression of something absolutely different” from any other Portuguese or other countries’ regional embroideries.
Rural woman's blouse |
Maria Clementina found the right words to describe it:
“of such graceful design and so beautifully embroidered that it could easily compete with a more aristocratic piece. Many peasant embroideries, made for personal use and not for sale, are so carefully worked as to be technically perfect. This works is done during the short intervals between their heavy labor in the fields and in the home, with the loving care bestowed on work destined to last several generations.”
Tailed Waistcoat. |
Today, Guimarães embroidery is used in tablecloths, valances, napkins, doilies, sweetheart’s handkerchiefs and many other pieces that embellish the home, and also in accessories for ladies and children. This work begun in the middle of the 20th century, adapting shirt’s motifs to house linen. Unlike the popular embroidery from which it stems, it is not made by the people, for the people, once it is executed by professional embroiderers. As it is very time consuming it became expensive, not accessible to all purses, ending to be a ”rich embroidery” ...
But we have good news… The interest in learning traditional stitches from Guimarães is growing and we hope that, soon, it will return to “the people’s” hands…
*In this post I've used four books on Portuguese embroidery - Traditional embroidery of Portugal; Guimarães Embroidery - a renewed tradition; Bordados e Rendas de Portugal; Embroidery and lace in the house linen of Entre Douro e Minho
April 9, 2013
Tutorial Tuesday
Happy Tuesday, everyone!
Hope you are all doing well! I know Spring is in full swing for some of us, bringing fresh blooms in the garden and thoughts of warmer temps that don't require a jacket. It seems that almost everyone I know has been headed to the beach for a bit of a Spring break and reprieve from chilly weather. I decided I would join in, but whenever I travel with a swimsuit, I always end up with a less-than-lovely plastic bag for my swimsuit. Which prompted today's tutorial: A swimsuit travel bag.
Note: If you have the clear vinyl bags from comforter or bed linen packaging, it works in place of the vinyl for this project. As well as oil cloth or coated cotton.
Step one: Transfer your embroidery pattern onto the fabric of choice and stitch. I used white cotton muslin for the front of my bag, with a gingham fabric for the back. Cut your pieces of fabric and vinyl into 10x11-inch pieces.
Step two: Using a 1/4-inch seam, sew around three edges of the vinyl. Turn it inside out and set aside.
Step eight: Add swimsuit and take off to the beach or pool!
This is a quick item to make. If you leave out the vinyl and use a fabric lining, it works as a travel bag for underthings, as well.
Hope you give this tutorial a try and have a very happy Tuesday!
Hope you are all doing well! I know Spring is in full swing for some of us, bringing fresh blooms in the garden and thoughts of warmer temps that don't require a jacket. It seems that almost everyone I know has been headed to the beach for a bit of a Spring break and reprieve from chilly weather. I decided I would join in, but whenever I travel with a swimsuit, I always end up with a less-than-lovely plastic bag for my swimsuit. Which prompted today's tutorial: A swimsuit travel bag.
I purchased this pattern from The Story of Kat a while back, and had been looking for a place to add her vintage swimsuit. I thought this was a perfect place for it.
If you would like to make your own swimsuit bag, you'll need the following supplies:
-fabric cut into two 10x11-inch pieces
-two pieces of clear vinyl in 10x11-inch pieces
-embroidery pattern of choice (I used this)
-embroidery hoop
-coordinating floss
-embroidery needles
-sewing machine with thread of choice
-scissors
-one safety pin
-a 40-inch piece of ribbon
-seam ripper
Note: If you have the clear vinyl bags from comforter or bed linen packaging, it works in place of the vinyl for this project. As well as oil cloth or coated cotton.
Step one: Transfer your embroidery pattern onto the fabric of choice and stitch. I used white cotton muslin for the front of my bag, with a gingham fabric for the back. Cut your pieces of fabric and vinyl into 10x11-inch pieces.
Step two: Using a 1/4-inch seam, sew around three edges of the vinyl. Turn it inside out and set aside.
Step three: Place the fabric pieces right sides together and stitch a 1/4-inch seam around three edges, leaving the top open.
Step four: In order to create the vinyl lining of this bag, place the fabric pieces you just sewed, inside of the vinyl piece. Make sure the wrong sides of the seems are facing one another.
Fold the fabric over to create a 1-inch hem and pin in place.
Step five: Set your sewing machine to the zigzag stitch, and stitch around the hem where the fabric edge meets the vinyl. I went over this stitch twice just to reinforce it. Trim away threads right at the edge of the stitch.
Step six: Flip the bag. You should have a pouch now. Take your seam ripper and open up the seam on the side of the bag, just above the zigzag stitch. You only need to open up the seem on the outside, not the inside top of this hem.
Step seven: Place the safety pin on one end of your ribbon piece, and begin to thread it through the hole you just opened the seam to.
Use the safety pin as a guide to gather the fabric and push the ribbon through the top hem of the bag.
Once you pull the ribbon through the opposite side, trim the ends of the ribbon and knot the end.
Step eight: Add swimsuit and take off to the beach or pool!
Hope you give this tutorial a try and have a very happy Tuesday!