

Many of you embroiderers have probably already heard of Jodie Rackley's lovely new book: Happy Stitch: 30 Felt and Fabric Projects for Everyday. It's a gorgeous book and I was super happy when Jodie asked if we'd like to feature it with a giveaway AND a tutorial she put together just for Feeling Stitchy readers!
Without further ado, here's Jodie! Oh and psst! Be sure to read through to the bottom for the exciting giveaway part! :)
Endless Summer Headband DIY tutorial
Hi Feeling Stitchy Friends! I’m Jodie Rackley of Lova Revolutionary and the author of Happy Stitch! I’m going to share with you a simply stitchy tutorial for a Navajo-inspired Summer Headband! A super cute and perfect accessory for summer!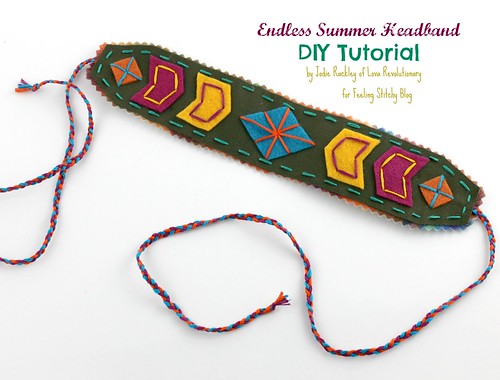
Materials:
Several scraps of felt in a few different colorsCanvas fabric or a solid colored fabric
Several colors of embroidery floss
Scissors, pinking sheers
Embroidery needle

*** I used eco felt for all of my shapes in peacock, golden rod, fuschia, and orange and DMC floss in 947, 972, 3844, 718
1. Print and cut out your template shapes. Use the template shapes to cut 1 large diamond, 4 arrows in two different shades, and 2 small diamonds. Using the large headband shape cut one from canvas or another solid fabric and one from felt using pinking shears.

2. Starting with your large diamond shape, center it in the middle of you canvas fabric and use a star stitch to secure your diamond. Center your arrows about a ¼ inch away from your diamond and use a long backstitch to secure them. Use a modified star stitch to secure your small diamonds.

3. After all of your shapes are stitched on to your canvas/solid colored material, cut 12 long pieces of embroidery floss, 4 pieces each of 3 different colors that you are using. Separate them so you have 6 pieces of 3 colors. Tie a knot to hold all the threads together and loosely braid them together, repeat with your remaining threads to use for the other side of your headband, these will become the ribbons for the sides of the headband.

4. Now that you have your braided strands, center the end on the felt piece that you cut out and secure it with a few stitches, repeat on the other side.

5. Last, pin your canvas embellished piece on top of your felt and stitch a straight stitch all the way around the edge.

6. Wear your headband and look super cute and Navajo summery!

Thanks, Jodie, for your beautiful tutorial!
Giveaway Time!
And now, readers, for the exciting giveaway part! I got a sneak peek of this book, and it's so inspiring that I'm giving away 2 copies of Happy Stitch!
My personal favorite pattern is this bird design tote bag - but I'm also pretty charmed by her signature owl design and her cute felt rowhouses.
There are so many gorgeous, colorful projects in this 144 page book! I think you need it. :)
Jodie is also giving away 1 pattern of your choice from her store (I have my eye on that sweet fox) and 1 felt fox kit, also from her store.
To win, leave a comment and let's settle a crafty internet rivalry - fox vs. owl: who's cuter? Comments will be closed on Sunday night, August 12 at approximately 9 PM, US Central Time. Go!


